BigML’s upcoming release on Wednesday, December 15, 2021, will be presenting a new set of Image Processing resources to the BigML platform! To warm up for the release, we already saw an introduction to the basic concepts of Image Processing as well as how BigML, with composite sources, lets you use your image data to build any Machine Learning model. In this post, we show you four different ways to label images on the BigML platform.
Image labels are important in Machine Learning. Particularly, they are indispensable when solving image classification problems. As such, BigML provides flexible ways to get your images labeled.

1. Labeling Images by Folders
A common practice in the industry is to group images by folders, with the folder names being their labels. This is indeed the most straightforward way.
For instance, you may organize your training data by putting the image files into subfolders like this:

So all your grape images or the images you want to label with “grape” are in the “grape” folder and all your strawberry images are in the “strawberry” folder.
Now, you can create a zip file by compressing the two folders together:

Or on the command line, assuming you are in a directory whose immediate subdirectories are grape and strawberry, you can use a command like:
zip -r grape-strawberry.zip grape strawberry
to create the zip file.
After uploading the zip file to the BigML platform, an image composite source will be created. Go to the “Fields” view tab and you will see the image label as one of the fields in the composite source. They match the folder names.

Go to the “Images” view tab, you will see all images have been properly labeled:

2. Labeling Images on the Dashboard
If you didn’t organize your image files in folder structures and have already uploaded them, don’t worry. BigML Dashboard provides an interactive way to label your images. You can create an image composite source by uploading an archive file (a tar or zip file). Because the files are not in a folder structure, the composite source doesn’t have a label field:

If you go to the “Images” view tab, it shows all the images in the composite source.

Besides viewing all the images, you can select them to perform certain operations. One of the operations is to “Label images”.
Before images can be labeled, you need to create a label field. You can do this by adding the field before selecting the images to label. On top of the images, on the left is a “Label field” textbox. To add a label field, click on the “+” next to the textbox and you will be prompted with a dialog box asking for the field name and the field type.
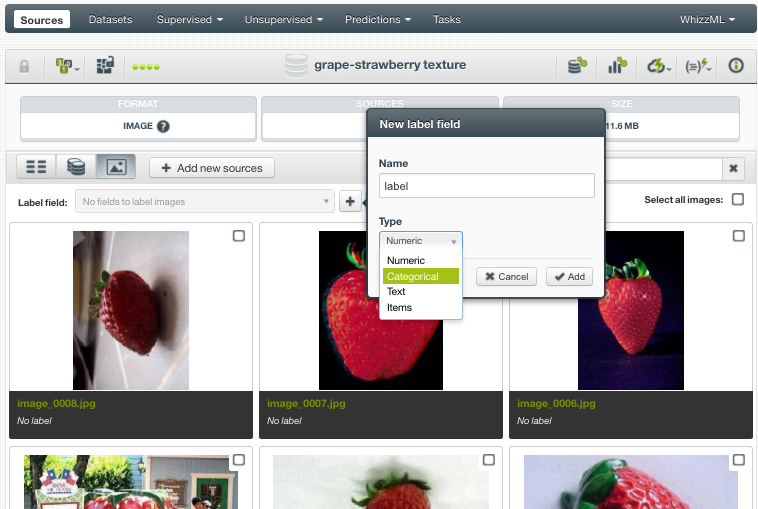
After entering the field name and selecting its type from the dropdown, click the “Add” button to create the label field.
When making image selections, you can use the “Select all images” checkbox on the top right to select all images. You can also use the “Search by name” box, which acts as a name filter. That is when a text string is typed into the box, all images whose names contain the string are shown and can be selected. For example, I typed “image_” in the textbox, and all images whose names contain “image_” showed up in the view. In fact, all of them were images of strawberries:

I selected all of them and clicked on the “Label images” button at the bottom right. This labeled all selected images by giving the label field a value, such as “strawberry” shown below:

I can do the same for the grape images, by selecting all of them and then adding the label value. After this, all images will be labeled.
3. Providing Labels by Using “Table+Image” Composite Sources
In some real-world scenarios, images and their labels are prepared separately. They are in separate files. For instance, there could be a collection of images while their labels are in a CSV or JSON file.
In addition to labels, CSV or JSON files can provide other information about the images, such as captions, comments, geo-coordinates, etc.
To accommodate this scenario of using a separate file for image labels and other information, BigML provides composite sources of format “Table+Image”. Here “table” refers to CSV or JSON files because they provide extra information in tabular formats.
As suggested by the name of the format, there are two parts to your data. One is a collection of images, another a table file that is a CSV or JSON file. In the case of CSV, one or more of its columns refer to the images. These columns will become fields in the composite source created and have the optype of path, which contains the file names of the corresponding images. Other columns will contain information about the images, such as labels.
Here is an example of a zip file containing 66 files. Using the command
unzip -l grape-strawberry+table.zip
we can see its file list (each ellipsis … represents the files omitted for brevity):
Archive:  grape-strawberry+table.zip
  Length      Date    Time    Name
---------  ---------- -----   ----
    37567  11-25-2020 21:56   092_0001.jpg
    20750  11-25-2020 21:56   092_0002.jpg
    19104  11-25-2020 21:56   092_0003.jpg
                              ...
    85537  11-25-2020 21:56   092_0030.jpg
     1822  12-06-2020 22:26   grape-strawberry.csv
    20354  05-17-2020 20:57   image_0001.jpg
    10074  05-17-2020 20:57   image_0002.jpg
    11772  05-17-2020 20:57   image_0003.jpg
                              ...
    21629  05-17-2020 20:57   image_0035.jpg
---------                     -------
  1281536                     66 files
Among the 66 files, 65 are jpg image files and one is the CSV file grape-strawberry.csv, which contains (again, ellipsis for brevity):
"image", "label"
"092_0001.jpg", "grape"
"092_0002.jpg", "grape"
"092_0003.jpg", "grape"
...
"image_0033.jpg", "strawberry"
"image_0034.jpg", "strawberry"
"image_0035.jpg", "strawberry"
There are two columns in the CSV, “image” is for references to the image files, which are their filenames. the “label” column is for the labels of the images.
Uploading the zip file will create a “Table+Image” composite source. In its “Sources” view below, you can see that the CSV becomes a component source:

In its “Fields” view, you can see that the image labels have been added, which is a field from the CSV:

4. Merging Separately Labeled Images
Sometimes images are labeled separately. In certain applications, one class of images are extracted from a set of data and uploaded to the BigML platform. Then, another class of images are uploaded. There can be many classes of images that are prepared and uploaded at different times, and they should be merged together to create datasets for Machine Learning. BigML composite sources are great for merging images.
As a refresher, a composite source is a collection of other sources which are called component sources. The power and flexibility of composite source lies in its ability of allowing many types of component sources. When all component sources are images, such a composite source is called an image composite source. Component sources can be composite sources too, this is when a composite source can be used for merging different sets of images.
To illustrate how it is done, we upload two zip files, which contain two classes of images respectively. In the first zip file, all images are inside a folder grape. And in the second zip, all images are inside a folder strawberry. As seen in the previous sections, when a zip file of images is uploaded to the BigML platform, an image composite source is created.

If we click on one of the composite sources, we will see its “Fields” view as below. Here we can see all its fields, including the label field.

Below is the “Sources” view of the composite source, where we see its component sources — all images.

Now we want to merge those two classes of images by creating a new composite source from the two just uploaded. We first make sure both have the same fields. Comparing the “Fields” view of the strawberry image composite below with the grape one shown above, we see that they have the same fields “image_id”, “filename” and “label”. They also have the same image features: Histogram of gradients, which has 234 fields.

If any of the fields is different or the fields are in different orders, we would not be able to create the new composite source as desired.
After confirming that the two composite sources have the same fields, we can close them by going to the cloud action icon in the title bar and clicking on “Close This Composite Source”:

All composite sources are created as open, which means they are modifiable. Closing a source makes it not modifiable anymore. Only closed composite sources can be component sources of another composite.
Now that the two composite sources are ready, we click on the “Create Composite Source” icon on the title bar of the source list view:

Then we select the two composite sources we want to merge and click on the “Create composite source” button on top of the list:

After giving a name, the new composite source is created:

We can see the new source is still an image composite source, and it inherits all the fields including the image features from those two composite sources, which become component sources as shown below in its “Sources” view:

Now we create a 1-click dataset from the new composite source, and we see two classes of images marked by its label histogram:

As you see, BigML provides many flexible ways to label images in order to accommodate different business needs and use cases. In fact, there are even more advanced ways to label images on the BigML platform. For instance, you can label images programmatically via the BigML API. You can also use BigML’s powerful Flatline tool to extract certain properties from different fields of a dataset and add them to label fields.
Do you want to know more about Image Processing?
Please visit the dedicated release page for more information and documentation, and join the FREE live webinar on Wednesday, December 15 at 8:30 AM PST / 10:30 AM CST / 5:30 PM CET. Register today, space is limited! Stay tuned for the next blog post of our series that will be about how to build a simple image classifier on the BigML Dashboard!

7 comments