In this fifth post about Boosted Trees, we want to adopt the point of view of a user who feels comfortable using some programming language. If you follow this blog, you probably know about WhizzML or our bindings, which allow for programmatic usage of all the BigML’s platform resources.

In order to easily automate the use of BigML’s Machine Learning resources, we maintain a set of bindings, which allow users to work with the platform in their favorite language. Currently, there are 9 bindings for popular languages like Java, C#, Objective C, PHP or Swift. In addition, last year we released WhizzML to help developers create sophisticated Machine Learning workflows and execute them entirely in the cloud thus avoiding network problems, memory issues or lack of computing capacity, while taking full advantage of WhizzML’s built in parallelization. In the past, we wrote about using WhizzML to perform Gradient Boosting and now we are making it even easier to perform with our Winter 2017 release.
In this post, we will show how to use Boosted Trees through both the bindings and WhizzML. In the case of our bindings example, we will use our popular Python binding, but the operations described here are available in all the bindings. Let’s wrap up the preambles and see how to create Boosted Trees without specifying any particular option, just with all default settings. We need to start from an existing Dataset to create any kind of model in BigML, so our call to the API will need to include the ID of the dataset we want to use. In addition, we’ll need to provide the boosting related parameters. For now, let’s just use the default ones. This is achieved by setting the boosting attribute to an empty map in JSON. We would do that in WhizzML as below,
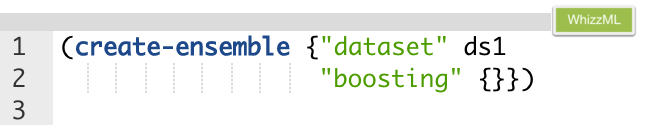
where ds1 should be a dataset ID. This ID should be provided as input to execute the script.
It’s the same way that you should create a decision tree ensemble, with the difference being the addition of the “boosting” parameter.
In Python bindings the equivalent code is:

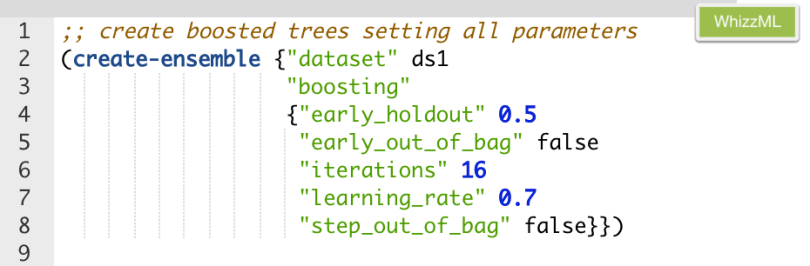
Let’s see now how to customize the options of Boosted Trees. To have a list of all properties that BigML offers to customize gradient boosting algorithm, please visit the ensembles page in the API documentation section. In a WhizzML script, the code should include the settings we want to use in a map format. For instance, if we want to adjust all available properties the code should be:
The equivalent code in python bindings would read:

Creation arguments in Python bindings are structured as a dictionary. They are consistent with the natural dictionary representation of JSON objects in the language.
When we were talking about creating Boosted Trees, we explained some applicable parameters that can help you improve your results by proper tuning. It’s very easy to evaluate your Boosted Trees either through WhizzML or the Python bindings: you just need to set the ensemble to evaluate and the test dataset to be used for the evaluation.

Similarly, we can use the Python syntax as follows:

Next up, let’s see how to obtain single predictions from our Boosted Trees once we are past the evaluation stage. For this, we need the ensemble ID and some input data that should be provided with “input_data” parameter. Here’s an example:
 The equivalent code in Python Bindings would be:

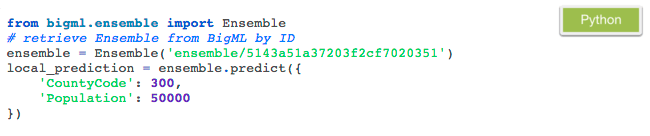
In addition to this prediction, calculated and stored in BigML servers, the Python bindings allow you to instantly create single local predictions in your compute. The Ensemble information is downloaded to your computer the first time it is used, and as predictions are computed in your machine, there are no additional costs or latency involved. Here is the straightforward code snippet for that:
You can create batches of local predictions by using the predict method in a loop. Alternatively you can upload the new data set you want to predict for to BigML. In this case, results will be stored in the platform when the batch prediction process finishes. Let’s see how to realize this latter option first in Python:

The equivalent code to complete this batch prediction by using WhizzML can be seen below:

A batch prediction comes with configuration options related to the inputs format such as the fields_map, which can be used to map the dataset fields to the ensemble fields especially if they are not identical. Other options affect the output format, like header or separator. You can provide any of these arguments at creation time following the appropriate syntax described in the API documents. We recommend that our readers check out all batch predictions options in the corresponding API documents section.
We hope this post has further encouraged you to start using WhizzML or some of our bindings to more effectively analyze and take action with your data in BigML. We are always open to community contributions to our existing bindings or to any new ones that you think we may not yet support.
Don’t miss our next post if you would like to find out what’s happening behind the scenes of BigML’s Boosted Trees.
To learn more about Boosted Trees or to direct us your questions about WhizzML or the bindings, please visit the dedicated release page for more documentation on how to create Boosted Trees, interpret them, and predict with them through the BigML Dashboard and the API; as well as the six blog posts of this series, the slides of the webinar, and the webinar video.

2 comments