In the first part of this series, we introduced the BigML Node-RED bindings and showed how to install and use them to create a simple BigML-powered flow in Node-RED. In this second installment, we are going to create a second flow which will give us the opportunity to consider in greater detail important concepts such as input-output matching and node reification.
Using an existing ensemble for prediction
As a second example of how you can use BigML with Node-RED, let’s build another flow that will use the ensemble created in our first installment to make a prediction each time a new event comes in.
One great way to identify a BigML resource is through a tag you assign it at creation time. The tag could represent what the ensemble is used for, or any other kind of information that can help you distinguish it from other resources of the same type in your BigML account. For example, you may want at some point to create a new version of that ensemble by including more recent training data. If you keep the same tag for each successive version of the ensemble, you will be able to find all ensembles sharing the same tag and identify the most recent version by looking at the creation date. Another approach for doing the same is creating a project that will uniquely home all the successive versions of the ensemble. In this case, you would not filter based on tags, rather on the project.
To give more substance to this, we are going now to show how you can create a flow to:
- Select the most recent ensemble tagged with a given tag.
- Use it to create a remote prediction whenever a new event comes in.
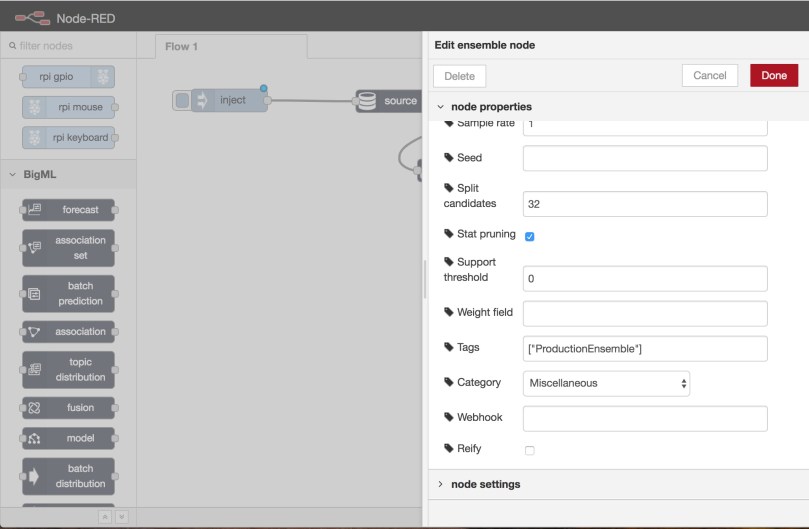
First thing, we need to have an ensemble with a tag of our liking, so we know which tag to use at step 1. To this aim, let’s modify slightly the flow we defined in the previous section to make it assign a tag to the ensemble it creates. For this, just double-click the ensemble node and lookup the Tags field and make its content read like that in the following image.
The
Tagsfield value is["ProductionEnsemble"]because you can specify any number of tags for your BigML resources. For example, to also assign aFraudDetectiontag, you would use
["ProductionEnsemble", "FraudDetection"].
Once you have done that, click the Done button, then the Deploy button, and finally inject a new message with the inject node to have the flow create a new set of resources, including our tagged ensemble.
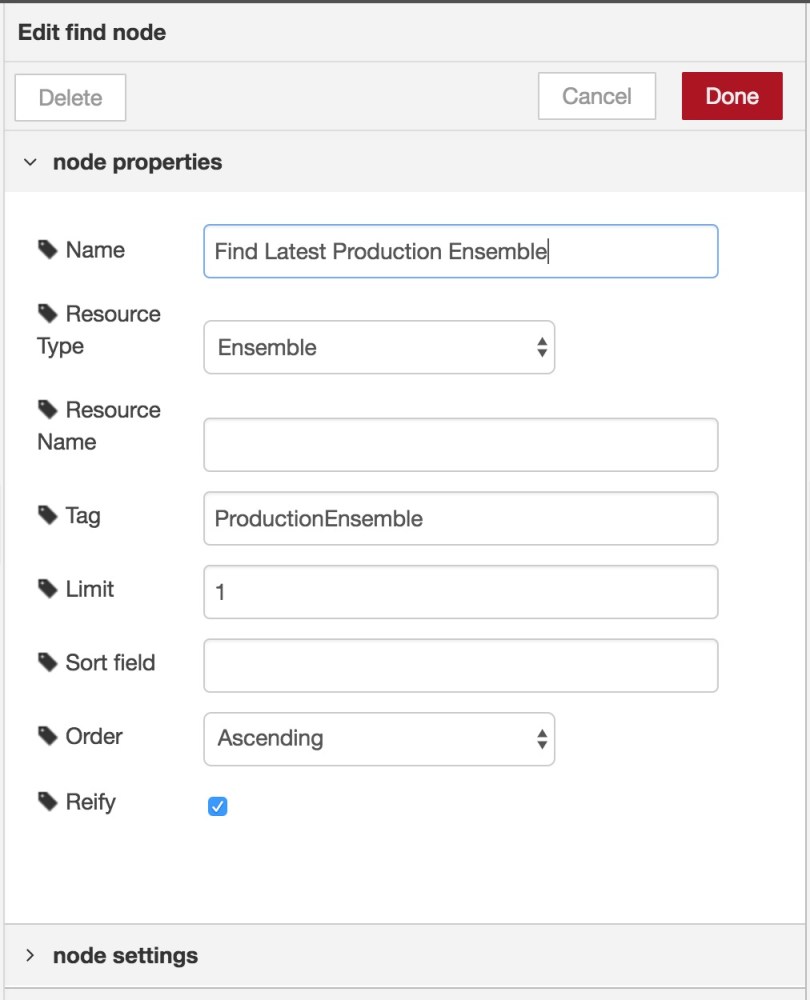
Now, we can create a new sub-flow in our diagram using a Find node. Find it in the left-hand node palette and drag it onto the canvas area, then double-click it to access its configuration. Here, we want to specify the kind of resource the node should lookup and a tag it should contain, as the following image shows:
When you are done with this, click Done. Then, add a Prediction node to the canvas and connect the Find node output to the Prediction node input. Next, add a Reify node to control the execution of our flow and connect it with the Prediction node.
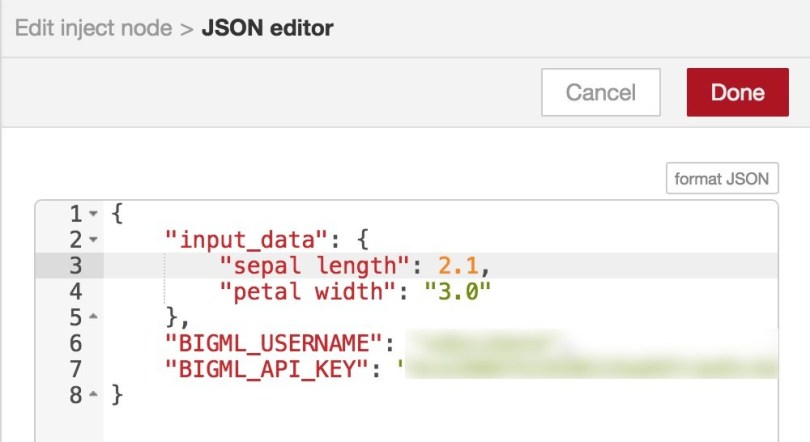
Finally, we need an inject node sending over your BigML API credentials. You can copy/paste the original inject node you already have. Besides your credentials, the inject node should also inject an event used as an input for the prediction. We do this by adding an input-data field to the JSON that is injected, as shown in the image below.
Now, if we attempt to run this flow by injecting an event (just click the inject node input pad), we will get an error.
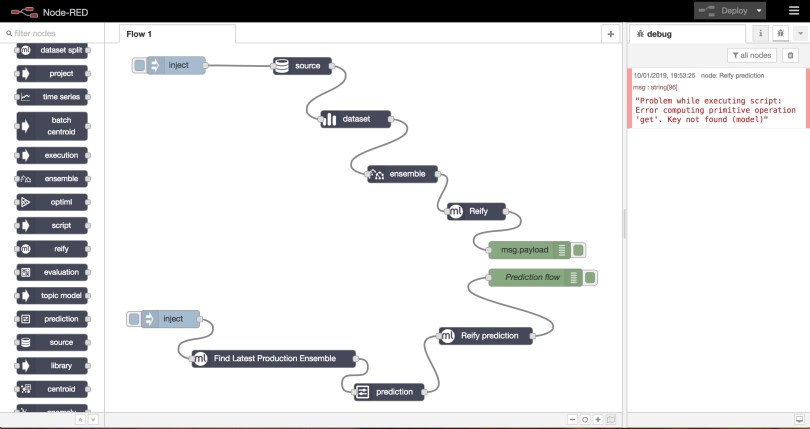
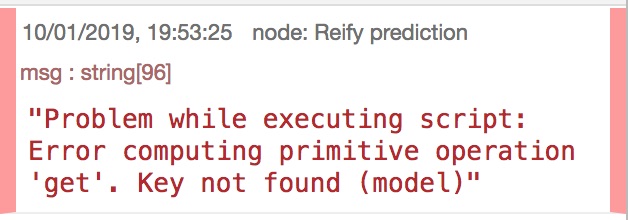
If you look to the error message closely, you will see it display the node that triggered the error, i.e., the prediction node, and the error cause:
This basically means that the prediction node did not find a required value, i.e. model, in the incoming message. If you hover the output port of the Find Latest Production Ensemble node and the input port of the prediction node, you will see the former’s output port is named resource while the latter’s input port is named model.
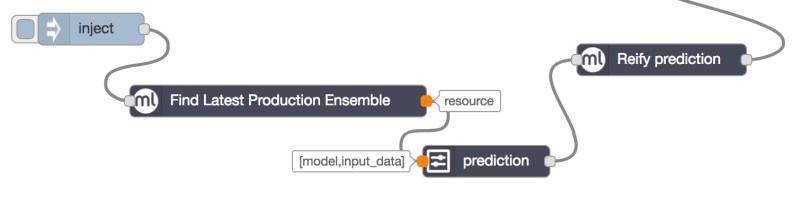
What this means is that:
- The
findnode will add aresourceproperty to the message payload. - The
predictionnode will require amodelproperty and aninput-dataproperty to work properly.
We made sure the input-data was provided by the inject node, so what must be missing is the model property. The model property represents the model we want to use for the prediction. But, hey! This is exactly what the find node should produce in its output. Hence, the issue here is a mismatch between the find node output and the prediction node input.
We can fix this by renaming the find node output port to model. To do this, double-click the find node and then display the node settings pane, just below the node properties pane we have been using all the time. Here, add model as an output port name for the only output port that is defined, as shown in the image below.

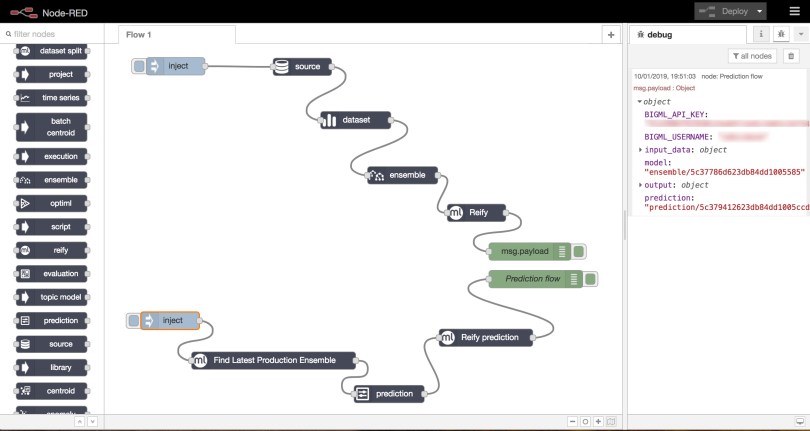
With this in place, click Done, then Deploy and inject a new message. This time the flow will execute correctly and give the following output, where you can see a prediction was created and its outcome stored under the key result.
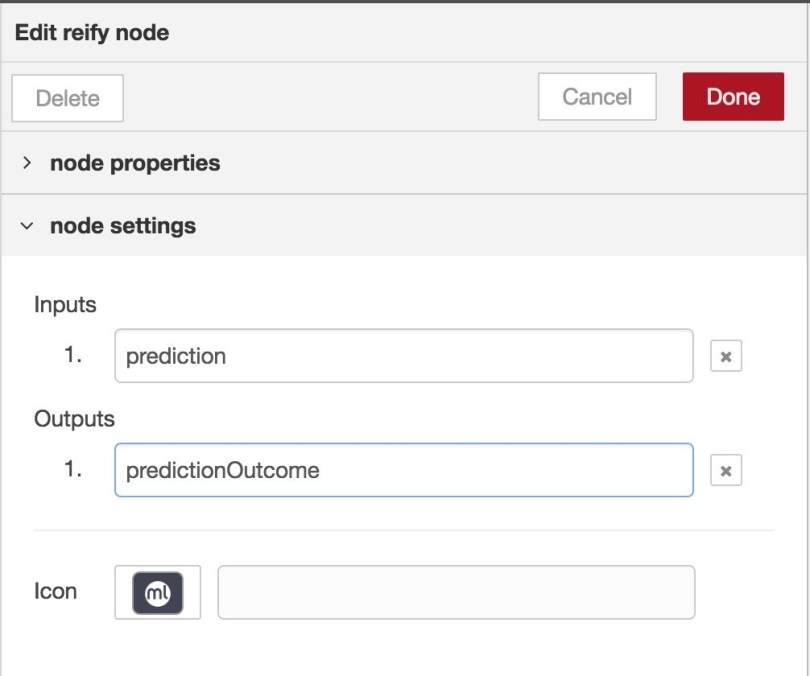
If you wanted to get the prediction outcome under a different key, you’d only have to change the reify node settings and specify that key as the output port name, as the following image displays.
The importance of reifying nodes
In both of our examples above, we have used a special node, called a Reify node, at the end of our flow. This had basically two objectives:
- Triggering the execution of the flow on BigML. When you create a flow diagram using the BigML Node-RED bindings, what happens behind the scene is a WhizzML script is created to carry through that flow. This requires you to tell NodeRED when your flow is complete and you want to execute it.
- Extracting a value from a resource. Since many BigML operations create new resources, which are identified through a resource ID, the Reify node also serves a different purpose, that of getting the actual resource definition and extracting a specific value from it. We have seen that in action in our last example, where we created a prediction and extracted the
outputkey, which was then sent forth with the payload under theresultkey orpredictionOutcomedepending on the node configuration.
On a more abstract level, you could say that you need to reify when you want to go from the BigML/WhizzML realm down to concrete values which you can pass on to other kinds of Node-RED nodes. This means whenever you want to consume the result of a BigML flow in a non-BigML node, you should reify it. We did exactly this in the examples presented here before injecting the BigML node output into the Node-RED debug node. Another situation where you will want to reify your BigML node output is when you connect it to multiple nodes, including to multiple BigML nodes.
Since reifying is such a common step, the BigML Node-RED bindings provide an additional way to reify a node’s output. In fact, you can reify any node output by selecting the Reify property in that node edit panel, as shown in the following image.
You can use this option whenever you want to reify a node and do not need to get the corresponding resource to extract a specific value from it (as the Reify node will allow you to do by providing an output key path as discussed above).
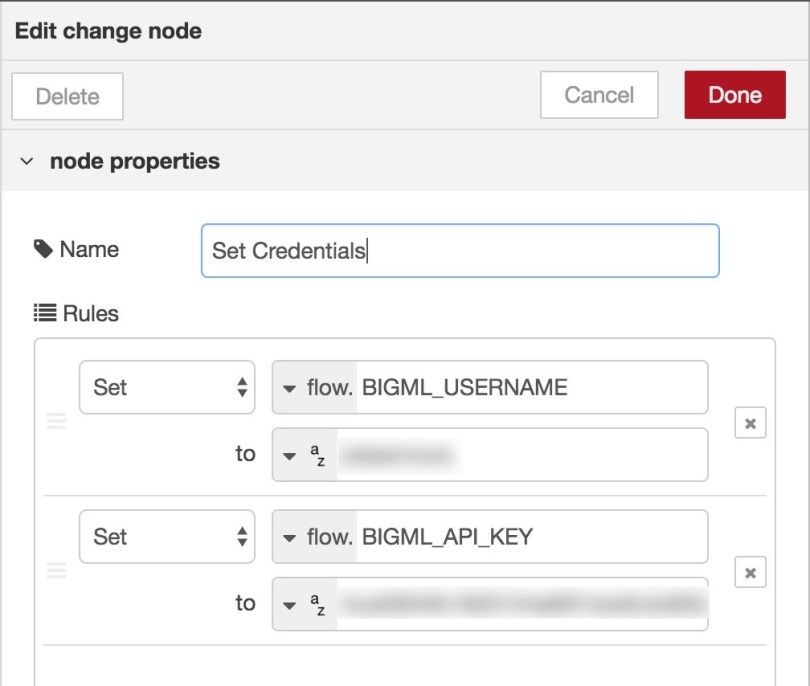
A better way to pass credentials to nodes
We have already looked at how you can provide your BigML credentials so the nodes you create can access your BigML account. Though very easy to do, this option will have your credentials moved along your flow embedded in the message payload. This might not be a good solution for you, so the BigML Node-RED bindings provide an additional way to let your BigML nodes know what BigML account they should access and be able to send the required credentials out.
In addition to sending your BigML credentials with the message payload, you can store them inside the flow context, which is a special data structure Node-RED manages so it is accessible from within a flow. To set flow context properties, you can use a Node-RED standard change node. Drag it from the node palette and then set its properties as shown in the following image.
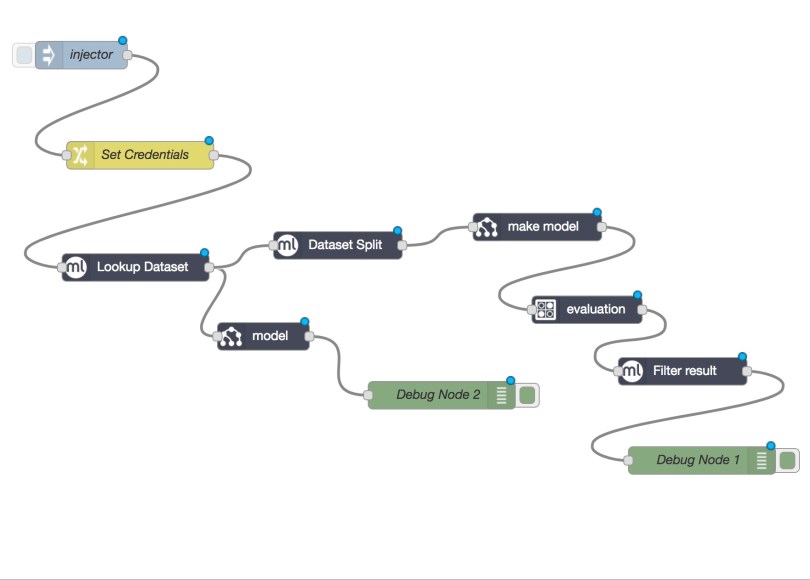
The change node will only do its work when it gets triggered by an event. So, you should make sure to trigger it before you actually attempt to reify any BigML node. The following image shows how you can do that in a reliable way.
Conclusion
In this second part of our series about the BigML Node-RED bindings, we discussed how to properly connect inputs and outputs, pass your credentials so they are not transmitted across the whole flow, and node reification. In the next installment of this series, we will present more advanced material, including an in-depth discussion of inputs and outputs, strategies for debugging errors, and how to add a WhizzML processor able to run your own WhizzML code. Let us know how you are using the BigML Node-RED bindings and provide any feedback to support@bigml.com. Stay tuned for part 3!
