Continuing with our Object Detection release blog posts series, today, we’ll showcase how to automate the training of the object detection models (and their predictions) that anyone will be able to create in BigML in short order.
Annotating object locations in images
As discussed in previous posts, BigML already offers classification, regression, and unsupervised learning models (e.g., clustering, anomaly detection). They all accept images as just another input data type usable for model training. In fact, when images are uploaded a new Source is created for each and their corresponding IDs are added to a new Composite Source object with a new image field type. In summary, images can be combined with any other data type and can be assigned one or more labels by using the new label fields.
What happens if you need to determine the presence and location of some specific objects in the picture? As we touched on in the previous posts, this is what Object Detection is tailormade for. After all, the goal of an Object Detection model is to predict the regions in the image where you can find a specific object(s).
That’s just another Supervised Learning problem, so the algorithm will expect you to provide examples of the regions in your training data to learn from. That has led to the definition of a new field type: Regions. The Regions field contains the label that identifies at least one of the objects that you want to detect plus its coordinates in the picture. If more than one object appears in the same image, the field will contain a list of them. To create your training data you need to provide not only the images but also some annotations that will determine the boxes and labels of the objects of interest in the training images. BigML does offer a tool for drawing those regions. However, this post solely focuses on automation so let’s assume that you already had your annotations taken care of.
The adorable kittens example
Before we proceed with our example, a quick confession: your author loves cats. They are curious, clever, elegant and delicate animals. No wonder they own the Internet and they have a near-monopoly on Object Detection demo datasets to boot. So let’s honor the tradition and put together a cat image dataset to illustrate today’s post.
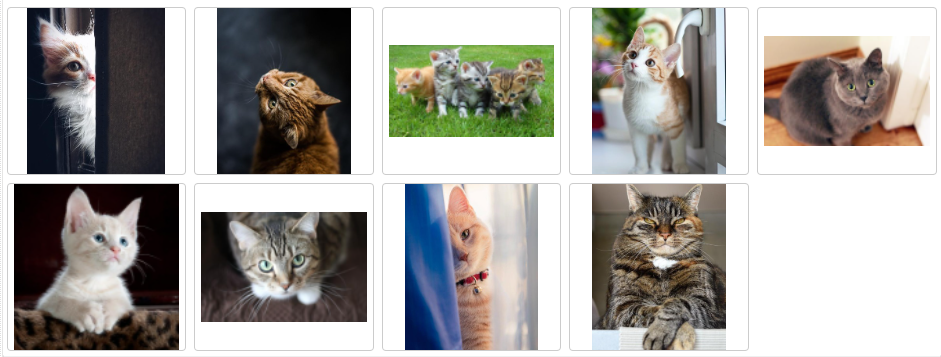
This small collection of images was retrieved from pexels.com. We’ve gone ahead and located and labeled the eyes, and added an annotations file that contains their locations in each image. We could, very well, label and locate other body parts (like noses or ears) and store all of them in the same regions field or in a separate Regions field per class if you want to create separate models for each type of object. In this example, we’ll keep it simple but you get the idea. The finalized annotations data looks as follows.
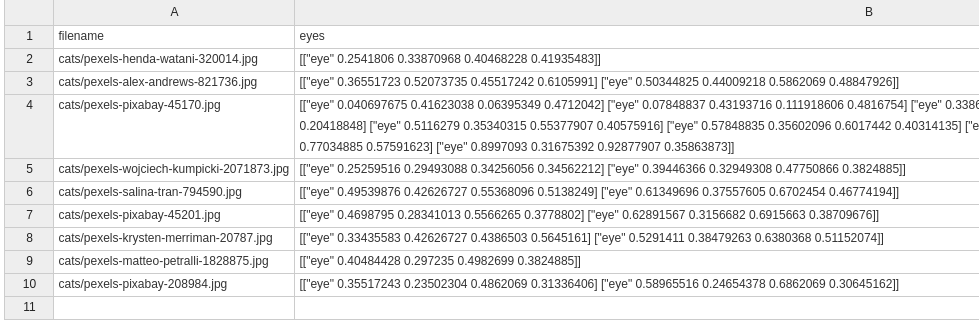
Every row contains the information related to one of the images. The first field contains the relative path to that image file (stored in my laptop in this case) and the second field stores the regions information as a list of lists. Each of these inner lists starts with the label name plus the top, left, width and height of the region expressed in relative coordinates (as the ratio to the image dimensions). Other coordinate formats, like the absolute number of pixels for those measures, are also acceptable as long as they are consistent throughout the dataset.
To upload the annotated images, we created a .zip file that contains both the CSV and the images. That’s everything we need to start using BigML.
Creating an Object Detection model using the bindings
The Python bindings happen to be the most up-to-date library that you can use to interact with BigML from any Python client application. In this case, we’d like to upload the compressed file that contains our images and corresponding regions annotations.
from bigml.api import BigML
api = BigML()
composite_source = api.create_source(
    "cats.zip",
    {"name": "Cats' eyes example"})
api.ok(composite_source)
Using this code, you create a connection to BigML (provided that your credentials were previously set as environment variables) and upload the compressed file. That immediately kicks off the creation of a Composite Source that will contain a new source per image and will associate the corresponding regions to each one of them. The api.ok command waits for the ansynchronous process to end and finally stores the finished Composite Source result in the corresponding variable. The result will show up in the dashboard as seen below.
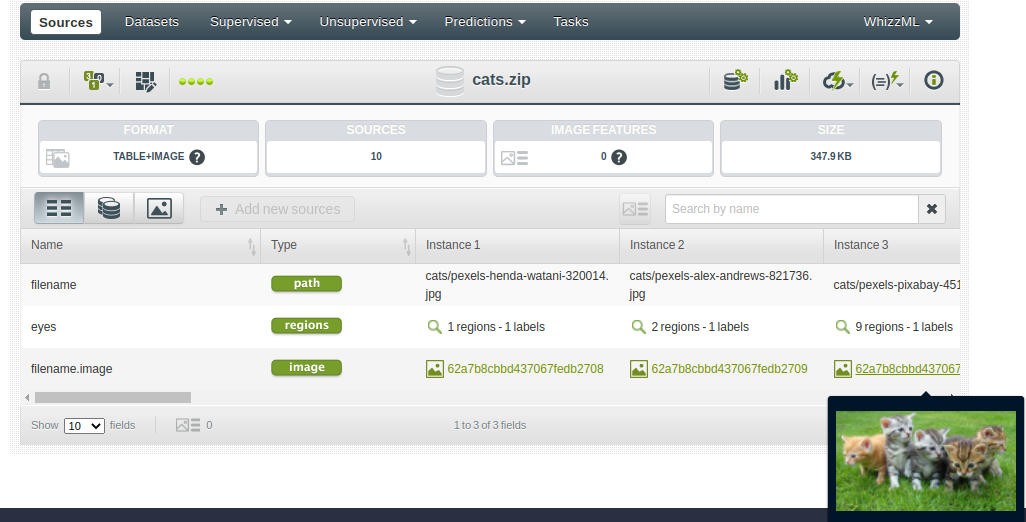
As you see, a table+image Composite Source has been created by associating the source ID generated for each image (stored in the filename.image field) with the regions defined in the annotations file.

The next step for training is creating a dataset from it.
dataset = api.create_dataset(composite_source)
api.ok(dataset)
The regions labels and boundaries will be readily summarized and following that step, we’ll be ready for modeling. Naturally, we’ll need to use a Deepnet in order to learn the positions of the objects of interest.
deepnet = api.create_deepnet(dataset)
api.ok(deepnet)
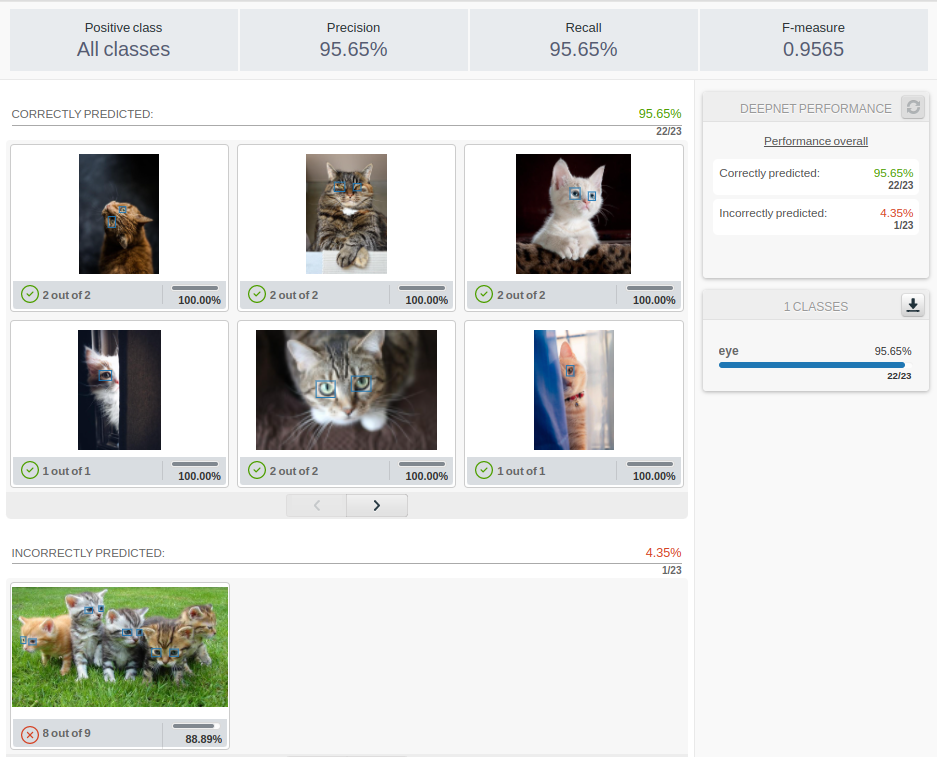
That may take a little while, even for this simple 9-image composite source. In the end, you will see in the dashboard that the results are expressed as the comparison of the original regions and the ones detected by the trained Deepnet.
The deepnet variable will contain the description of the layers and coefficients that have been found to fit the training data.
Server-side Object Detection automation
WhizzML is the Domain Specific Language (DSL) offered by BigML to handle automation in the platform. The good news is the steps to create an Object Detection Model using WhizzML are almost identical to that of plain vanilla classification or regression models. The one difference being for Object Detection problems the objective field of the model has the new Regions type. However, because this field is the last in your Dataset, you don’t even have to indicate explicitly that it’s your objective field. BigML infers that by default.
(define data-repo
  "https://github.com/mmerce/notebooks/raw/master/object_detection/data")
(define data-url
  (str data-repo "/cats.zip"))

(define composite-source-id (create-source {
  "remote" data-url
  "name" "Server-side Cats' eyes example"}))
(define dataset-id (create-dataset composite-source-id))
(define deepnet-id (create-deepnet dataset-id))
Running this in WhizzML’s REPL will help you create the Deepnet model that is able to detect cats’ eyes in a new picture.
Detecting the objects
The goal of the Deepnet that we created above is to detect the existence of any eyes in the picture and their locations. One big differentiator is that BigML models are actionable the very moment they are created, so you can use the previously created Deepnet to produce predictions immediately. Let’s go over an example of this using the Python bindings.
data_url = \
    "https://github.com/mmerce/notebooks/raw/master/object_detection/data"
prediction = api.create_prediction(
    deepnet, {"filename.image": "%s/cat_eyes_test.jpg" % data_url})
To make a prediction, the test image is uploaded and a Source is created from it. Then, the method calls the API to create the corresponding prediction using that Source ID and the previously created Deepnet.

By all means, you can do the same on the server-side.
(define test-data
  (str data-repo "/cat_eyes_test.jpg"))
(define source-id (create-source {"remote" test-data}))

(define prediction-id (create-prediction {
  "model" deepnet-id
  "input_data": {"filename.image" source-id}))
And by lowering the score threshold, we can even detect the eyes of a different kind of beast!
prediction = api.create_prediction(
    deepnet, {"filename.image": "smeagol.png", "region_score_threshold": 0.3})

Calling a remote API may not be suitable in some restricted EdgeML or embedded type scenarios that require local predictions. For those cases, BigML offers the Deepnet class in the Python bindings, which is able to interpret the Deepnet information and produce predictions locally when calling its .predict method.
from bigml.deepnet import Deepnet
local_deepnet = Deepnet(deepnet)
local_deepnet.predict("cat_eyes_test.png")
Where cat_eyes_test.png is the image in which we want to detect the objects and it’s located in the current directory.
By now, you probably realize that this code snippet is nearly identical to the one we used to solve a classification or regression problem in the past. In fact, automating image processing for Object Detection using BigML is not very different in that sense, because all the complexity of handling image data is conveniently solved for you in the background by the platform. This means you will now be able to retrain as many models and produce as many predictions as you like based on image data without having to go back to the drawing board. Existing BigML users know using the right abstractions so that they can stick to homogeneous, traceable, scalable, and reusable processes is our number one priority. If you’re new to this though, welcome to BigML‘s world of automated Machine Learning!
Want to know more about Object Detection?
If you have any questions or you would like to learn more about how Object Detection works, please visit the release page. It includes a series of blog posts to gently introduce Object Detection from scratch. And remember to register for our free live webinar that will take place on June 28, 2022, at 8:00 AM PST / 10:00 AM CST / 5:00 PM CET.

One comment