As part of our Object Detection release posts, on this post, we would like to showcase the entire application development process from problem identification to model deployment, a seemingly ambitious undertaking.
Let me tell you the story of how (and why) I built a plant disease detector web application. You too can build similar applications that will help you in your daily life in just a few hours. If you would like to play with the app, you can find it here and the source code is also available in this repository.
The light-bulb moment
A few days ago, I moved to a new home. Having some more outdoor space than in my previous home got me interested in gardening. During the first weeks, my new plants looked wonderful. But, as happens to newbies, I was overestimating my ability to take care of them properly. I had no previous gardening experience, so when they started turning bad, I had no idea what to do. But then, a light-bulb moment! Why not collect images and build a model to identify common diseases in my plant images? It could be quite a useful Object Detection model to identify any unhealthy leaves.
Collecting plants images
Building a dataset from scratch is not an easy task. I needed to find (and label) many examples of images for each kind of disease. Actually, before that, I did a bit of research to find common plant diseases. Fortunately, after some googling, I found PlantDoc, a public dataset for plant disease detection. This dataset already contains 2,598 images across 13 plant species and 27 classes (17-10, disease-healthy). It can be downloaded from Github, where the images are already split into train/test subgroups. Because the format of the regions was not exactly the one expected by BigML, I built a simple Python script to transform them. With that script, I generated two folders with train/test images and two JSON files with the regions for each subgroup. Then, I generated zip files and uploaded them to BigML, obtaining the following Table+Image composite source for the training data:

I also generated some alternative versions of the source with only some of the classes, e.g., I created the plantdoc-train-10 composite with only the instances that belonged to the top 10 classes with more examples in the dataset.
As Table+Image is a read-only format, I transformed the composite source into an editable one:
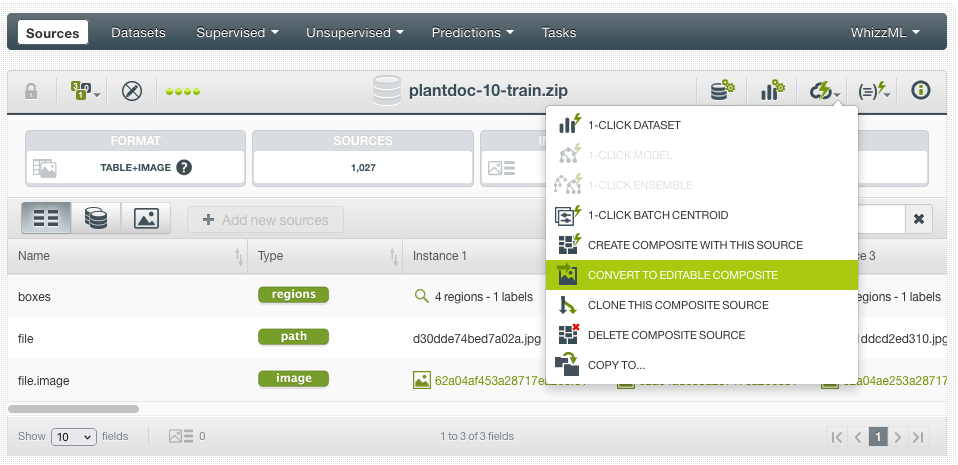
Once the editable composite was created, I was able to rename some labels that were not accurate:

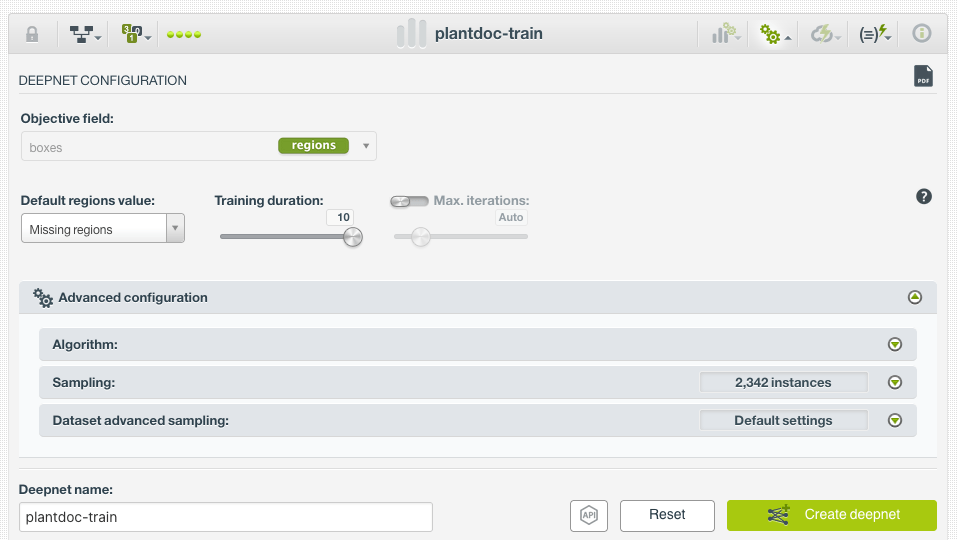
Training an Object Detector
This is the easiest part of the process as I chose a Training duration value of 10 in the Deepnet configuration menu. I trained two Deepnets in parallel. One for the dataset with all the classes and another one for the dataset with only 10 classes.
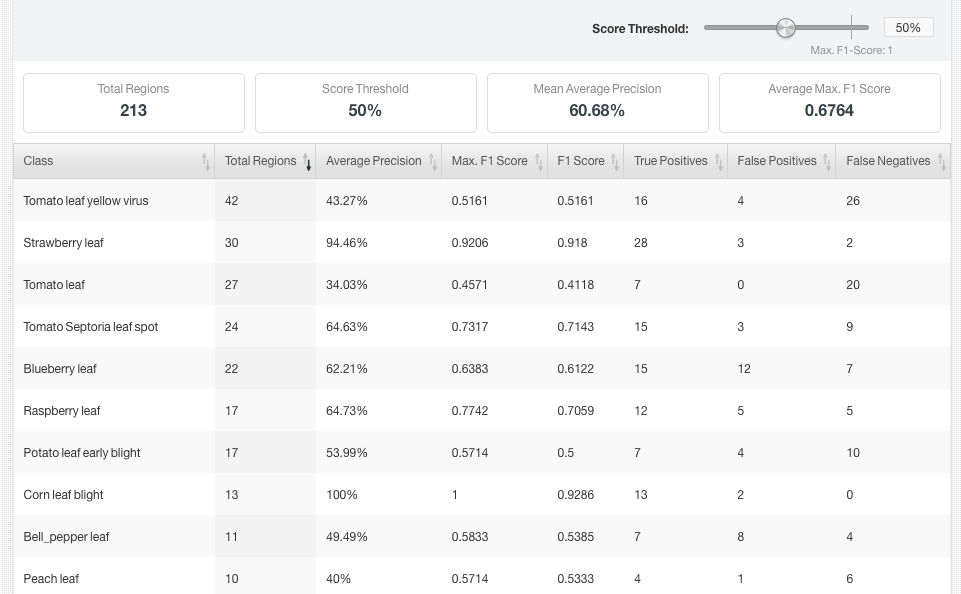
The dataset with 10 classes generated a model with better evaluation metrics, achieving a mAP@50 of 60.08%.
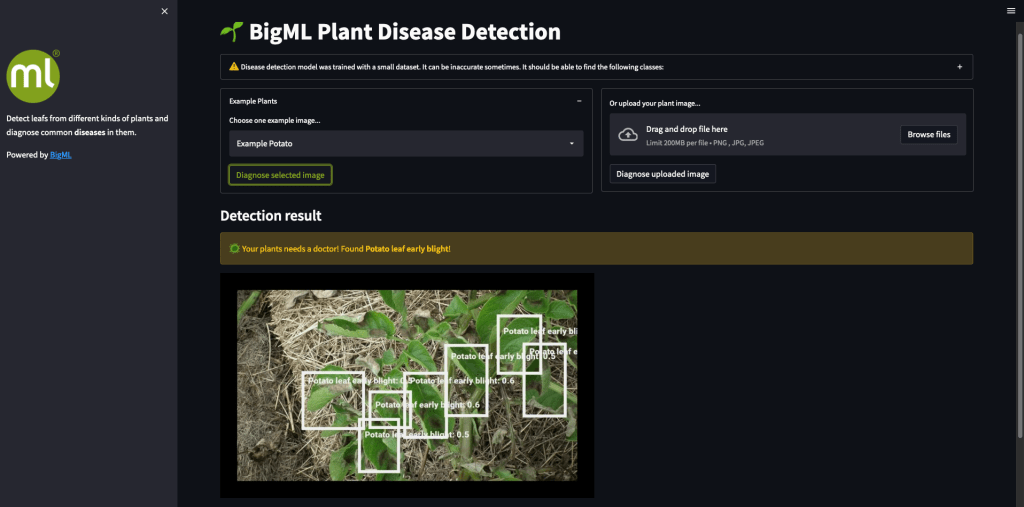
Building and deploying an application
Last but not the least, I set out to build a web application that lets users upload their own plant images and obtain diagnostics from the model. The user interface I had in mind was extremely straightforward. I just needed to show a file uploader and some annotations with the diagnosis on top of the user-uploaded images. Later on, I also added some information about model capabilities and some example images.
I decided to use Streamlit to build the application, as it offered everything I need. You can find the 136 lines of Python code needed to build the app in the repository. But here, I will focus on how I used the BigML API to upload user images as sources followed by the previously trained object detector to find the interesting regions:
API_URL = "https://labs.dev.bigml.io/andromeda/"
API_USERNAME = os.getenv("BIGML_USERNAME")
API_KEY = os.getenv("BIGML_API_KEY")
API_AUTH = f"username={API_USERNAME};api_key={API_KEY}"

def detection(uploaded_file):
    # Upload image to BigML as a source
    source_response = requests.post(
        f"{API_URL}source?{API_AUTH}",
        files={"file": ("plant_image", uploaded_file)}
    )
    source = source_response.json()["resource"]
    # Generate prediction data
    data = {"model": MODEL, "input_data": {"000002": source}}
    response = requests.post(f"{API_URL}prediction?{API_AUTH}", json=data)
    regions = response.json()["prediction"].get("000000", [])
    # Remove the source, we don't need it any more
    requests.delete(f"{API_URL}{source}?{API_AUTH}")
    return [r for r in regions if r[5]>PREDICTION_THRESHOLD]
As you can see, for every uploaded file, I sent two requests to BigML API, one to upload the image as a source and a second one to find the regions. Before returning them, I filtered out regions with a confidence score below the prediction threshold.
Because I was using Streamlit, deploying this web app was just a matter of giving it access to the repository and configuring the needed environment variables with the BigML authentication information. Just like that, my Plant Disease Detection application was ready to rock and roll!
Now, it’s your turn to build applications on top of the versatile BigML Object Detection models. Feel free to use this repository as a template to start building your own Object Detection applications. One last thing, if you tell us about your applications, we will be happy to share them with our social media followers. Happy building!
Want to know more about Object Detection?
If you’d like to learn more about how Object Detection works, please visit the release page as it will be continuously updated to include links to the upcoming blog posts, the latest BigML Dashboard and API documentation, the webinar slideshow as well as the full webinar recording past the official launch date. One last thing, register today for the FREE live webinar on Tuesday, June 28 at 8:00 AM PDT / 05:00 PM PDT to save your spot!
