We are excited to introduce organizations, which makes it easy for companies to adopt Machine Learning across their entire corporate structure.
 By creating an organization, the BigML Dashboard becomes a collaborative workspace where all the users in the organization can access, work on, and visualize the same projects and resources. Furthermore, organizations enable you to define different roles and permissions for each user involved on your Machine Learning projects, in a similar manner to GitHub repositories.
To show BigML organizations in action, we will cover a use case that is particularly relevant at this time of the year: gym membership churn. Many people start exercising in the new year, but their proposed health plans go awry after a few weeks or months, despite their best intentions.

Gyms offer enticing memberships to combat this tendency and encourage customers to make long-term commitments. Let’s see how a gym chain that we’ll call “Greg’s Gyms” can improve their membership retention rates by analyzing their customer data and sharing it with the right people within their company by using BigML organizations.
At Greg’s Gyms, the data analysis team is the primary user of BigML and they need to share models and resources amongst themselves, as each member focuses on a different part of the overall Machine Learning process. For example, one person takes care of the data preparation, one primarily builds the predictive models, and another person supervises the whole process to make sure everything is correct. Additionally, the data analysts want to share their insights with other departments that will benefit downstream, such as the customer success team. Now with the BigML organizations capability, these team members can work together on projects according to their assigned roles and permissions that regulate their actions on BigML. Let’s dive in and see how to set up your organization in four easy steps.
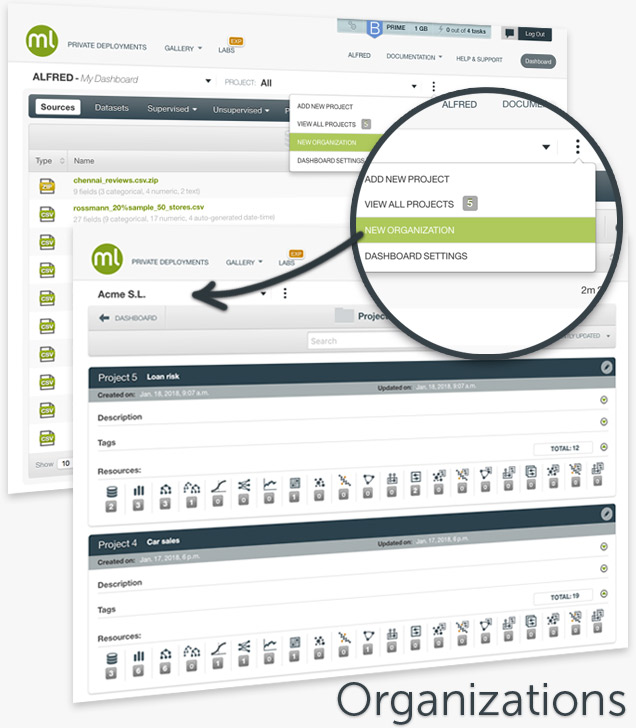
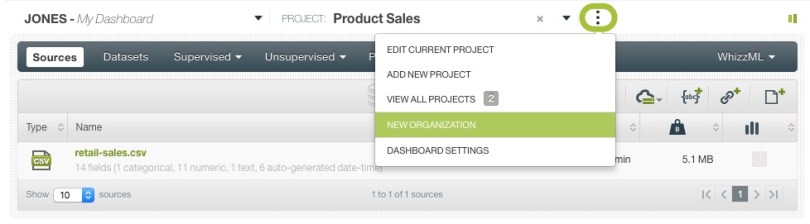
Create an Organization
The organizations feature is available for any user with a BigML account (whether it be a free account, a subscription, or a Private Deployment). However, to create an organization, you will need to purchase a BigML subscription that will be applied to your organization. From the BigML Dashboard, you can create an organization by clicking on the drop-down menu, as shown below.
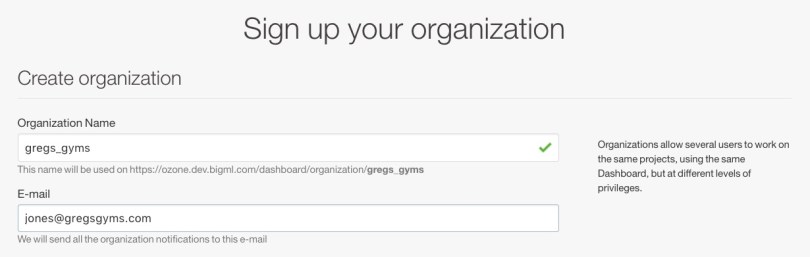
Next, you will need to enter some basic information to sign up your organization. Greg’s Gyms needs to put the following details to get started:
- Organization Name: instead of “Greg’s Gyms”, we’ll set it to “gregs_gyms”. This name will be used in the URL of the organization page that lists all the projects, so it cannot include spaces or characters other than letters, numbers, underscores, and dashes. The “display name” can be adjusted later on, and can include spaces and other characters.
- Organization E-mail: since “Jones” is creating this organization, his e-mail is pre-filled by default. This e-mail is the one where BigML will send all the notifications regarding the organization’s activity.
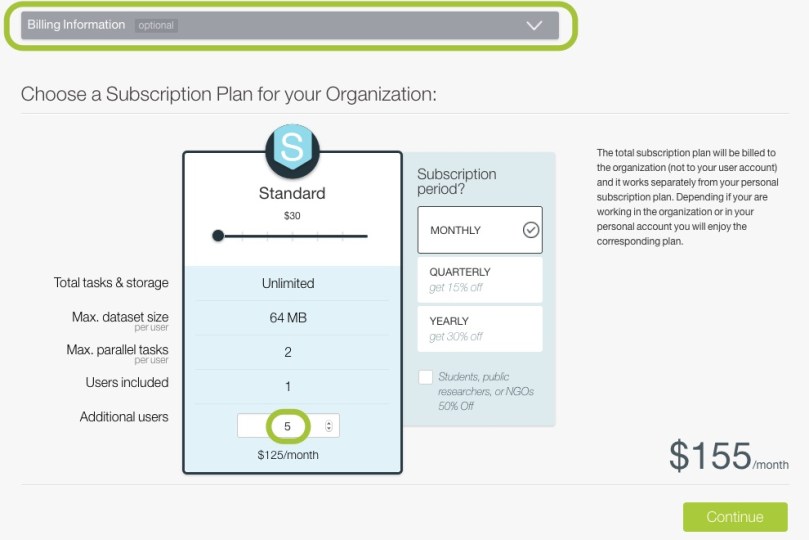
- Billing Information: here Jones can add the billing details for Greg’s Gyms (tab highlighted in the screenshot below). This information is optional; Jones can include it now if desired, or he can add or edit it later.
- Subscription Plan: Jones will need to buy a subscription plan to create an organization. Since he wants other team members to enjoy this organization’s subscription, Jones will put 5 “additional users”. All organization members will enjoy the same subscription when they work in the organization.
Add Users and Assign Roles
Each user that is part of an organization on BigML will have an associated role, which governs their actions within the organization. Each role has different permissions, which regulate the user’s actions within projects (explained in the next section). There are four different roles: owner, admin, member, restricted member.
- The owner of the organization has full access to projects and the organization account and is the only one that can manage the subscription plan.
- The admins of an organization have full access to projects, can invite other users to the organization, and manage their permissions.
- Members can create new projects, and access public and private projects where they have at least read permissions.
- Restricted members can access public projects and private projects where they have at least read permissions.
For our example, Jones is the owner by default as the creator of the organization. This means he manages the subscription plan of the organization and also has “admin” privileges. Jones can now invite other BigML users (both internal and external to Greg’s Gyms) to join his organization with their usernames. Each user will receive an e-mail to confirm the invitation. At least one other user must be added to the organization besides the creator. The GIF below shows how to add users via the “organization settings”, inviting the user “gbrown” to join as a “restricted member” (click on the GIF for a larger view).
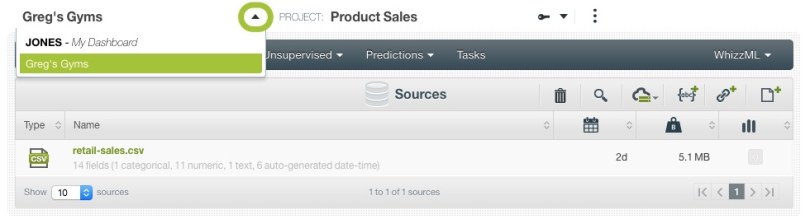
Individual users can belong to one or more organizations. As the different users work together in the organization, all the resources created will always belong to that organization (not to the user that creates them). For example, if Jones creates 5 datasets and 10 models in the “Greg’s Gym” organization, those 15 resources will all belong the organization and not his personal account. Jones can navigate between the different Dashboards for his personal account and his organization account(s) using the drop-down menu at the top left of the Dashboard, as shown below.
When Jones is working in his personal account (My Dashboard) he will enjoy his personal BigML subscription; when he is working in the “Greg’s Gyms” organization, he will enjoy the organization’s subscription. Resources can be transferred from his private Dashboard to an organization.
If a user’s account is deleted or he is removed from the organization, all the resources created by him in the organization will belong to the organization. If this were the case with Jones (who is the organization’s owner), another member would need to become the new owner.
Create Projects
After adding users and assigning roles, the next step to set up an organization on BigML involves projects and user permissions. All the resources in an organization need to be created within a project.
Continuing with our example, Jones now needs to create a project for his organization members to work on. Since the company’s current goal is to increase the number of customers who commit to year-long gym memberships, he creates a project titled “Gym Membership Retention”. Below we show how to toggle between different projects by using the drop-down menu at the center of the Dashboard, how to create a new project, and how to search in the project list view (click on the GIF for a larger view).
When creating a project, you must add a project name, and set it as public or private.
- Public projects allow all users in the organization to access the projects with write permissions.
- Private projects only allow members invited to the project to have access.
Additionally, you can add tags and a description for your project, or you can add these details later. After saving your new project, you will land in the project list view, where you can see all of the organization’s projects. Here you can search for projects by name, and see an overview of all of the resources created within a project.
Assign User Permissions
Now that he has created a project, Jones can assign users different permission levels for that project. There are three levels of permissions per project: manage, write, read.
- Manage permissions in a project gives you full access to the project resources and allow you to invite other users and edit their permissions within the project.
- Write permissions allow users to create new resources in a project.
- Read permissions allow users to view the resources in a project.
Assigning different permissions allows the organization’s admins to make sure the right people within an organization have the right access to resources on BigML. For example, Jones may want to give write permissions to his team of data analysts for their “Gym Membership Retention” project, but only give read permissions to the customer success team, since those employees will not be building models and making predictions. But by giving their customer success team access to view the models and predictions, this enables them to bring their unique domain knowledge to the table, creating an effective “meeting of the minds” to help solve the company’s customer retention challenges.

So there you have the basics of creating an organization on BigML! In our ongoing effort to make Machine Learning accessible for everyone, the BigML organizations feature is a big step forward to make company-wide adoption of Machine Learning easier than ever before. For more details about BigML organizations, please see our documentation on the dedicated release page. Try it out, and let us know your feedback and any questions at support@bigml.com.
Want to know more about Organizations?
If you have any questions or you’d like to learn more about how organizations work, please visit the dedicated release page. It includes the BigML Dashboard documentation, the webinar slideshow as well as the full webinar recording.
